Three hours to build github pages + hexo blogs
Because I envy friends around me for having a cool blog, I spent time in the afternoon setting up this blog. Thanks to online tutorials, I realized it wasn’t that hard. Here is a record of the process, practicing markdown on the way.
Why did you start this blog
Why GitHub Pages?
- The domain name is a second-level domain name for github, no need to pay for the space, no need to pay for the domain name
- popular and concise MarkDown writing syntax
- support for local writing, local preview
- seo optimization, github in google weight high
Why I’m blogging
- I am not good at expressing myself, so writing down what is in my head makes me more impressed and improves my ability to make things clear and think logically
- It helps me to accumulate more knowledge and enjoy the chain reaction brought by sharing.
- Writing in markdown makes me feel geeky
Preparation steps
Configure SSH keys
Generate SSH Keys
Before setting up the blog we have to use ssh keys to get our local git project connected to the remote github. First we need to check the existing ssh keys on your computer. right-click to open Git Bash and type: (If you get the message: No such file or directory, this is the first time you’ve used git.)
1
$ cd ~/. ssh
Generate a new SSH Key (Enter your own e-mail address here)
1
$ ssh-keygen -t rsa -C "邮件地址@youremail.com"
Then enter.
Then the system will ask you to enter a password. This password will be used when you submit the project, if it is empty then you don’t need to enter it when you submit the project. (If you enter the password without the * character, you can just type it in)
1
2
Enter passphrase (empty for no passphrase):<输入加密串>
Enter same passphrase again:<再次输入加密串>
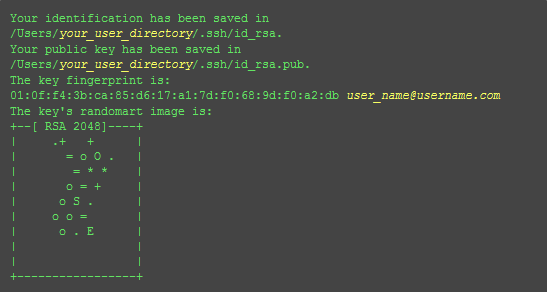
If you see this screen, you have successfully set up your ssh key.
Note: If you are using a mac, you need to add sudo in front of the command, for details you can see this article Hexo deployment prompted Fatal: Could not read from remote repository problem handling Hexo%E9%83%A8%E7%BD%B2%E6%97%B6%E6%8F%90%E7%A4%BAfatal-Could-not-read-from-remote-repository%E7%9A%84%E9%97%AE%E9%A2%98%E5%A4%84%E7%90%86/). E7%90%86/)
Add SSH Key to Github
- Open the local C:\Documents and Settings\Administrator.ssh\id_rsa.pub file. The path may also be C:\Users\Administrator.ssh, you can directly in the C disk to find id_rsa.pub file. The content inside this file is the human key just generated. If you can’t see this file, you need to set Show Hidden Files. Open it and copy the contents of this file exactly. 2.
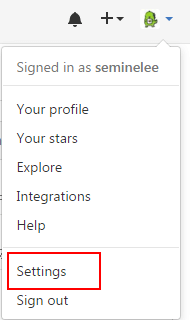
- Log in to the github system. Click Image —> Settings —> SSH and GPG keys in the upper right corner.
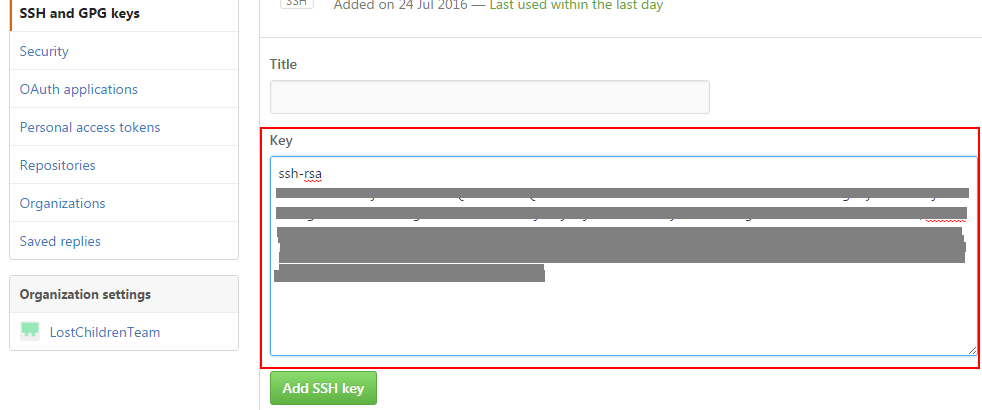
- Click New SSH key in the upper right corner, paste the contents of the locally generated key file you just copied into it (in the Key text box), and click Add SSH key. Click Add SSH key and you’re done
Test it.
You can enter the following command to see if the setup was successful, git@github.com的部分不要修改:
1
$ ssh -T git@github.com
Then type yes Then you will see the
1
Hi seminelee! You've successfully authenticated, but GitHub does not provide shell access.
Setting up user information
Now that you can link to GitHub via SSH, there’s still some personal information you need to complete. Git records commits based on the user’s name and email address, and GitHub uses this information for permissions, so enter the code below to set up your personal information and replace the name and email address with your own.
1
2
$ git config --global user.name "seminelee"//用户名
$ git config --global user.email  "may.air@qq.com"//填写自己的邮箱
After completing the above steps the machine has successfully connected to github.
Starting a blog
After establishing a good link with GitHub, you can easily use the Pages service provided by it, GitHub Pages are divided into two kinds, one is your GitHub username to establish username.github.io such a user & organization page (station), the other is dependent on the project’s pages. If you want to set up a personal blog, you can use the first kind, such as seminelee.github.io, which is an accessible station, and you can only set up one under each username.
Create a repository on Github
Log in to Github and create a repository called seminelee.github.io. Note! Github Pages Repository name is specific, for example, my Github account is seminelee, then my Github Pages Repository name is seminelee.github.io. The details of the repository creation process are skipped.
Install Hexo
Hexo is a simple, fast and powerful blog publishing tool that supports Markdown format. Open Git Bash
1
$ npm install -g hexo
After installation, create a folder with the name hexo somewhere on my computer and right click in this folder to open Git Bash.
1
$ hexo init
Hexo then automatically creates all the files needed for the site in the destination folder. Now we have set up our local hexo blog. In the hexo directory type
1
2
$ hexo g
$ hexo s
Then go to the browser and type localhost:4000 to see, you can see the blog under the default theme, which realizes the local preview.
Change of subject
Empty the database before each theme change
1
2
3
$ hexo clean
$ hexo g
$ hexo s
Clone the theme via git clone, here using the next theme
1
$ git clone https://github.com/iissnan/hexo-theme-next.git
For more themes see What are some good looking Hexo themes? - GitHub - Knowing
Enabling Themes
1
theme: hexo-theme-next
Modify the theme attribute in the config.yml configuration file in the hexo directory, setting it to hexo-theme-next. (Note: Hexo has two config.yml files, one in the root directory and one under theme, at this point the modification is in the root directory.)
Updated Themes
1
2
$ cd themes/hexo-theme-next
$ git pull
Then you can preview it locally
1
2
$ hexo g #generate生成
$ hexo s #server测试环境,启动本地服务,进行文章预览调试
Uploaded to Github repository
Open _config.yml in the hexo directory and pull it to the bottom. Configure it like this, just change seminelee to your own github username. (Note the format, there should be a space after the colon, you can just copy the following code and modify it)
1
2
3
4
5
6
# Deployment
## Docs: https://hexo.io/docs/deployment.html
deploy:
  type: git
  repository: https://github.com/seminelee/seminelee.github.io.git
  branch: master
Then execute the command
1
2
$ hexo g #generate生成
$ hexo d #deploy开发环境
If the last line of the result is INFO Deploy done:git, then there is no problem. Otherwise, you can change the above configuration to the following commit using SSH, and change the username to your own
1
2
3
4
5
6
# Deployment
## Docs: https://hexo.io/docs/deployment.html
deploy:
  type: git
  repository: git@github.com:seminelee/seminelee.github.io.git
  branch: master
Execute the command again
1
2
$ hexo g #generate生成
$ hexo d #deploy开发环境
If you get an error deployer not found:github after executing hexo deploy, which is said to be a pitfall after hexo was updated to 3.0, you need to install hexo-deployer-git.
1
$ npm install hexo-deployer-git --save
After executing the command again, open https://seminelee.github.io/ to see the blog you’ve created!